docker镜像与分层
目录
*关于base镜像*
关于存储结构(About storage drivers)
先来创建一个自己的镜像
docker镜像的分层结构
容器的大小
修改时复制策略 copy-on-write (CoW)
Copying makes containers efficient
关于base镜像
base 镜像有两层含义:
- 不依赖其他镜像,从 scratch 构建。
- 其他镜像可以之为基础进行扩展。
所以,能称作 base 镜像的通常都是各种 Linux 发行版的 Docker 镜像,比如 Ubuntu, Debian, CentOS 等。
base 镜像提供的是最小安装的 Linux 发行版。
我们大部分镜像都将是基于base镜像构建的。所以,通常使用的是官方发布的base镜像。可以在docker hub里找到。比如centos: https://hub.docker.com/_/centos
点击版本可以看到github里的Dockerfile
1 | FROM scratch |
ADD命令将本地的centos7的tar包添加到镜像,并解压到根目录/下。生成/dev,/proc/,/bin等。
我们可以自己构建docker base镜像,也可以直接使用已有的base镜像。比如centos。我们可以直接从docker hub上拉取。
拉取
1 | docker pull centos |
查看
1 | # docker images centos |
可以看到最新的centos镜像只有200mb,是不是觉得太小了?这是因为docker镜像在运行的时候直接使用docker宿主机器的kernel。
Linux操作系统由内核空间和用户空间组成。
内核空间是kernel,用户空间是rootfs, 不同Linux发行版的区别主要是rootfs.比如 Ubuntu 14.04 使用 upstart 管理服务,apt 管理软件包;而 CentOS 7 使用 systemd 和 yum。这些都是用户空间上的区别,Linux kernel 差别不大。
所以 Docker 可以同时支持多种 Linux 镜像,模拟出多种操作系统环境。
需要注意的是:
-
base镜像只是用户空间和发行版一致。kernel使用的是docker宿主机器的kernel。例如 CentOS 7 使用 3.x.x 的 kernel,如果 Docker Host 是 Ubuntu 16.04,那么在 CentOS 容器中使用的实际是是 Host 4.x.x 的 kernel。
-
① Host kernel 为 4.4.0-31
-
② 启动并进入 CentOS 容器
-
③ 验证容器是 CentOS 7
-
④ 容器的 kernel 版本与 Host 一致
关于存储结构(About storage drivers)
上文里展示了如何下载一个base镜像。我们通常是基于这份base镜像来构建我们自己的镜像。比如,在centos里添加一个nginx负载均衡。首先,得需要了解镜像的结构是什么。
官方文档: https://docs.docker.com/storage/storagedriver/
先来创建一个自己的镜像
首先,base镜像是基于docker宿主机器kernel之上的Linux发行版。
现在,我们给这台机器安装一个vim,一个httpd. 基于Dockerfile来创建一个新的镜像。
我们的Dockerfile
1 | FROM centos:7 |
含义:
- 基于centos7的base镜像构建
- 安装vim
- 安装httpd
- 执行bash
在当前目录下新建一个文件Dockerfile, 填充上述内容。然后执行
1 | # docker build -t ryan/httpd:v1.0 . |
- -t 指定我们创建的镜像名称,镜像名称可以用
组织/id:version的方式标记 - 最后一个参数是Dockerfile所在的路径
., 表示当前目录
然后我们添加一个tag latest
1 | docker tag ryan/httpd:v1.0 ryan/httpd:latest |
- 即给镜像
ryan/httpd:v1.0标记为ryan/httpd:latest
构建完成之后,查看
1 | # docker images | grep -E '(ryan|centos)' |
可以运行我们创建的镜像:
1 | # docker run -d --privileged=true -it ryan/httpd:v1.0 /usr/sbin/init |
现在我们的基于原生base centos7的httpd服务器已经启动了。可以通过docker exec -it zealous_kirch /bin/bash来进入容器内部,查看启动httpd。
docker镜像的分层结构
我们可以查看镜像的历史,用上一步的镜像id f2b58b1192de
1 | # docker history f2b58b1192de |
启动镜像的时候,一个新的可写层会加载到镜像的顶部。这一层通常称为“容器层”, 之下是“镜像层”。
容器层可以读写,容器所有发生文件变更写都发生在这一层。镜像层read-only,只允许读取。
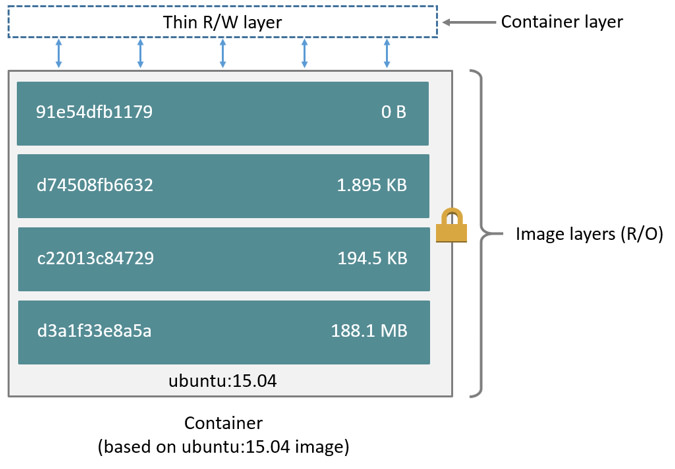
第一列是imageid, 最上面的id就是我们新创建ryan/httpd:latest. 下面几行都是我们dockerfile里定义的步骤堆栈。由此可以看出,每个步骤都将创建一个imgid, 一直追溯到1e1148e4cc2c正好是我们的base镜像的id。关于``的部分,则不在本机上。
最后一列是每一层的大小。最后一层只是启动bash,所以没有文件变更,大小是0. 我们创建的镜像是在base镜像之上的,并不是完全复制一份base,然后修改,而是共享base的内容。这时候,如果我们新建一个新的镜像,同样也是共享base镜像。
那修改了base镜像,会不会导致我们创建的镜像也被修改呢? 不会!因为不允许修改历史镜像,只允许修改容器,而容器只可以在最上面的容器层进行写和变更。
Note: If you need multiple images to have shared access to the exact same data, store this data in a Docker volume and mount it into your containers.
容器的大小
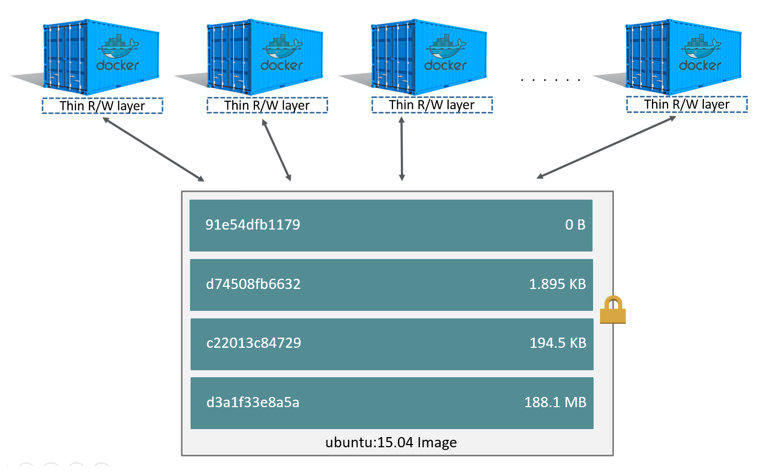
创建镜像的时候,分层可以让docker只保存我们添加和修改的部分内容。其他内容基于base镜像,不需要存储,读取base镜像即可。如此,当我们创建多个镜像的时候,所有的镜像共享base部分。节省了磁盘空间。
对于启动的容器,查看所需要的磁盘空间可以通过docker ps -s
1 | # docker run -d -it centos |
- 首先启动一个base镜像用来对比
- 可以看到第一行就是base镜像centos,第2列的size是0和202MB, 0表示容器层可写层的大小,virtual则是容器层+镜像层的大小。这里对比可以看到一共202M,正好是最初centos镜像的大小。
- 第二行是我们自己创建的镜像。virtual达到了444MB。对比前面的history部分,可以发现这个数字是每一层大小之和。同时,由于共享base,其中的202M是和第一行的镜像共享的。
Sharing promotes smaller images
When you use docker pull to pull down an image from a repository, or when you create a container from an image that does not yet exist locally, each layer is pulled down separately, and stored in Docker’s local storage area, which is usually /var/lib/docker/ on Linux hosts. You can see these layers being pulled in this example:
1 | $ docker pull ubuntu:18.04 |
Each of these layers is stored in its own directory inside the Docker host’s local storage area. To examine the layers on the filesystem, list the contents of /var/lib/docker/. This example uses the overlay2 storage driver:
1 | $ ls /var/lib/docker/overlay2 |
The directory names do not correspond to the layer IDs (this has been true since Docker 1.10).
Now imagine that you have two different Dockerfiles. You use the first one to create an image called acme/my-base-image:1.0.
1 | FROM ubuntu:18.04 |
The second one is based on acme/my-base-image:1.0, but has some additional layers:
1 | FROM acme/my-base-image:1.0 |
The second image contains all the layers from the first image, plus a new layer with the CMD instruction, and a read-write container layer. Docker already has all the layers from the first image, so it does not need to pull them again. The two images share any layers they have in common.
If you build images from the two Dockerfiles, you can use docker image ls and docker history commands to verify that the cryptographic IDs of the shared layers are the same.
-
Make a new directory
cow-test/and change into it. -
Within
cow-test/, create a new file calledhello.shwith the following contents:1
2#!/bin/sh
echo "Hello world"Save the file, and make it executable:
1
chmod +x hello.sh
-
Copy the contents of the first Dockerfile above into a new file called
Dockerfile.base. -
Copy the contents of the second Dockerfile above into a new file called
Dockerfile. -
Within the
cow-test/directory, build the first image. Don’t forget to include the final.in the command. That sets thePATH, which tells Docker where to look for any files that need to be added to the image.1
2
3
4
5
6
7
8
9$ docker build -t acme/my-base-image:1.0 -f Dockerfile.base .
Sending build context to Docker daemon 812.4MB
Step 1/2 : FROM ubuntu:18.04
---> d131e0fa2585
Step 2/2 : COPY . /app
---> Using cache
---> bd09118bcef6
Successfully built bd09118bcef6
Successfully tagged acme/my-base-image:1.0 -
Build the second image.
1
2
3
4
5
6
7
8
9
10
11$ docker build -t acme/my-final-image:1.0 -f Dockerfile .
Sending build context to Docker daemon 4.096kB
Step 1/2 : FROM acme/my-base-image:1.0
---> bd09118bcef6
Step 2/2 : CMD /app/hello.sh
---> Running in a07b694759ba
---> dbf995fc07ff
Removing intermediate container a07b694759ba
Successfully built dbf995fc07ff
Successfully tagged acme/my-final-image:1.0 -
Check out the sizes of the images:
1
2
3
4
5$ docker image ls
REPOSITORY TAG IMAGE ID CREATED SIZE
acme/my-final-image 1.0 dbf995fc07ff 58 seconds ago 103MB
acme/my-base-image 1.0 bd09118bcef6 3 minutes ago 103MB -
Check out the layers that comprise each image:
1
2
3
4
5
6
7
8
9$ docker history bd09118bcef6
IMAGE CREATED CREATED BY SIZE COMMENT
bd09118bcef6 4 minutes ago /bin/sh -c #(nop) COPY dir:35a7eb158c1504e... 100B
d131e0fa2585 3 months ago /bin/sh -c #(nop) CMD ["/bin/bash"] 0B
<missing> 3 months ago /bin/sh -c mkdir -p /run/systemd && echo '... 7B
<missing> 3 months ago /bin/sh -c sed -i 's/^#\s*\(deb.*universe\... 2.78kB
<missing> 3 months ago /bin/sh -c rm -rf /var/lib/apt/lists/* 0B
<missing> 3 months ago /bin/sh -c set -xe && echo '#!/bin/sh' >... 745B
<missing> 3 months ago /bin/sh -c #(nop) ADD file:eef57983bd66e3a... 103MB1
2
3
4
5
6
7
8
9
10
11$ docker history dbf995fc07ff
IMAGE CREATED CREATED BY SIZE COMMENT
dbf995fc07ff 3 minutes ago /bin/sh -c #(nop) CMD ["/bin/sh" "-c" "/a... 0B
bd09118bcef6 5 minutes ago /bin/sh -c #(nop) COPY dir:35a7eb158c1504e... 100B
d131e0fa2585 3 months ago /bin/sh -c #(nop) CMD ["/bin/bash"] 0B
<missing> 3 months ago /bin/sh -c mkdir -p /run/systemd && echo '... 7B
<missing> 3 months ago /bin/sh -c sed -i 's/^#\s*\(deb.*universe\... 2.78kB
<missing> 3 months ago /bin/sh -c rm -rf /var/lib/apt/lists/* 0B
<missing> 3 months ago /bin/sh -c set -xe && echo '#!/bin/sh' >... 745B
<missing> 3 months ago /bin/sh -c #(nop) ADD file:eef57983bd66e3a... 103MBNotice that all the layers are identical except the top layer of the second image. All the other layers are shared between the two images, and are only stored once in
/var/lib/docker/. The new layer actually doesn’t take any room at all, because it is not changing any files, but only running a command.Note: The
<missing>lines in thedocker historyoutput indicate that those layers were built on another system and are not available locally. This can be ignored.
修改时复制策略 copy-on-write (CoW)
docker通过一个叫做copy-on-write (CoW) 的策略来保证base镜像的安全性,以及更高的性能和空间利用率。
Copy-on-write is a strategy of sharing and copying files for maximum efficiency. If a file or directory exists in a lower layer within the image, and another layer (including the writable layer) needs read access to it, it just uses the existing file. The first time another layer needs to modify the file (when building the image or running the container), the file is copied into that layer and modified. This minimizes I/O and the size of each of the subsequent layers. These advantages are explained in more depth below.
Copying makes containers efficient
When you start a container, a thin writable container layer is added on top of the other layers. Any changes the container makes to the filesystem are stored here. Any files the container does not change do not get copied to this writable layer. This means that the writable layer is as small as possible.
When an existing file in a container is modified, the storage driver performs a copy-on-write operation. The specifics steps involved depend on the specific storage driver. For the aufs, overlay, and overlay2 drivers, the copy-on-write operation follows this rough sequence:
Search through the image layers for the file to update. The process starts at the newest layer and works down to the base layer one layer at a time. When results are found, they are added to a cache to speed future operations.
Perform a copy_up operation on the first copy of the file that is found, to copy the file to the container’s writable layer.
Any modifications are made to this copy of the file, and the container cannot see the read-only copy of the file that exists in the lower layer.
Btrfs, ZFS, and other drivers handle the copy-on-write differently. You can read more about the methods of these drivers later in their detailed descriptions.
Containers that write a lot of data consume more space than containers that do not. This is because most write operations consume new space in the container’s thin writable top layer.
简单的说,启动容器的时候,最上层容器层是可写层,之下的都是镜像层,只读层。
当容器需要读取文件的时候
从最上层镜像开始查找,往下找,找到文件后读取并放入内存,若已经在内存中了,直接使用。(即,同一台机器上运行的docker容器共享运行时相同的文件)。
当容器需要添加文件的时候
直接在最上面的容器层可写层添加文件,不会影响镜像层。
当容器需要修改文件的时候
从上往下层寻找文件,找到后,复制到容器可写层,然后,对容器来说,可以看到的是容器层的这个文件,看不到镜像层里的文件。容器在容器层修改这个文件。
当容器需要删除文件的时候
从上往下层寻找文件,找到后在容器中记录删除。即,并不会真正的删除文件,而是软删除。这将导致镜像体积只会增加,不会减少。
综上,Docker镜像通过分层实现了资源共享,通过copy-on-write实现了文件隔离。
对于文件只增加不减少问题,我们应当在同一层做增删操作,从而减少镜像体积。比如,如下测试。
Dockerfile.A: 分层删除文件
1 | FROM centos:7 |
构建
1 | docker build -t test:a -f Dockerfile.A . |
Dockerfile.B: 同层删除
1 | FROM centos:7 |
构建
1 | docker build -t test:b -f Dockerfile.B . |
比较二者大小
1 | [root@sh-k8s-001 tmp]# docker images | grep test |
显然,分层删除操作并没有真正删除掉文件。
来源